|
ERROR!
You must enable Java Script on your browser to navigate this site. |
||
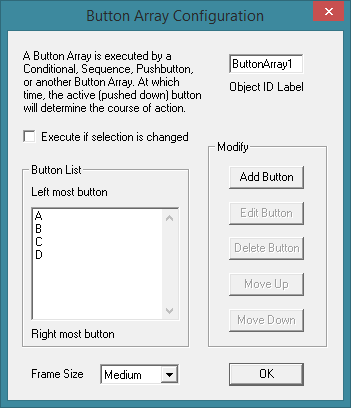
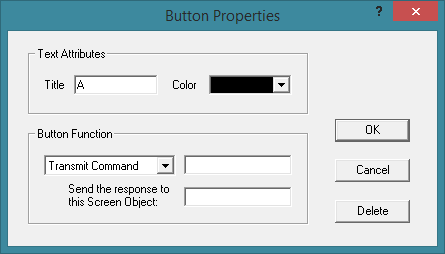
Button ArrayA Button Array is a very powerful tool which allows the operator to change the flow of the main  Once a Button Array is placed on the screen it can be selected by clicking on it with the left mouse button. To move the object, place the cursor over it, hold down the left mouse button and drag the object to the desired position. Resize handles are provided to allow adjustment of the overall size by dragging on them with the mouse in a similar fashion. To set the properties of a Button Array, Configuration Dialog Box: Object ID Label: Type in a label that will be used for identification by other objects within ModCom when sending instructions to the Button Array. Execute if selection is changed: Check this box to have the Button Array automatically execute its function each time the user changes the active button during Button List: List of individual buttons which make up the Button Array. The top most button in the list represents the left most button of the array. Use the modify buttons at the right to edit this list. Frame Size: Selects the overall size of the Button Array including the font size used for the text characters in the title. Modify:Add Button: Click on this to add a button to the Button Array. This will bring up another dialog box which can be used to set the properties of that particular button. See "Button Properties Dialog Box" below for more details. Edit Button: To use this option, a button must first be selected from the button list at the left. Click on this to edit the selected button. This will bring up another dialog box which can be used to set the properties of that particular button. See "Button Properties Dialog Box" below for more details. Delete Button: To use this option, a button must first be selected from the button list at the left. Click on this to delete the selected button from the Button Array. Move Up: To use this option, a button must first be selected from the button list at the left. Click on this to move the selected button one place up which equates to one place to the left on the Button Array layout. Move Down: To use this option, a button must first be selected from the button list at the left. Click on this to move the selected button one place down which equates to one place to the right on the Button Array layout. Button Properties Dialog Box: Text Attributes:Title: Type in the text which will appear on this particular button. Color: Selects the font color used for the characters in the title. Button Function:Drop-Down Menu: Choose the function which will be performed when the Button Array is executed and this particular button is active or
|