|
ERROR!
You must enable Java Script on your browser to navigate this site. |
||
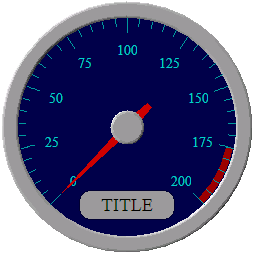
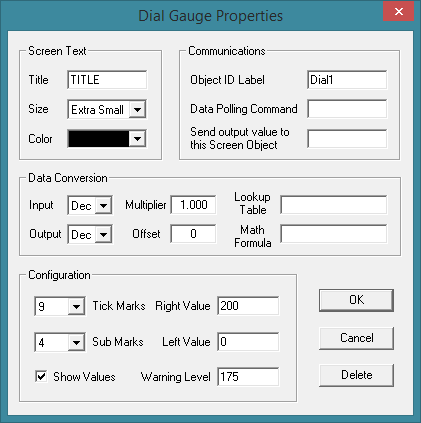
Dial GaugeA Dial Gauge is a Screen Object which is used to display live data in the form of a circular dial with a rotating needle. It can be configured to accept data from another object within ModCom, or to automatically poll an external  Once a Dial Gauge is placed on the screen it can be selected by clicking on it with the left mouse button. To move the object, place the cursor over it, hold down the left mouse button and drag the object to the desired position. Resize handles are provided to allow adjustment of the overall size by dragging on them with the mouse in a similar fashion. To set the properties of a Dial Gauge, Properties Dialog Box: Screen Text:Title: Type in the text that will appear on the bottom of the Dial Gauge. Size: Selects the font size used for the text characters in the Dial Gauge. Making changes to this attribute will also change the overall size of the Dial Gauge respectively. Color: Selects the font color used for the characters in the title. Communications:Object ID Label: Type in a label that will be used for identification by other objects within ModCom when sending data to the Dial Gauge, using the displayed reading as a variable in another object's function, or when evaluating Conditional statements specific to the Dial Gauge's value. Data Polling Command: If wishing the Dial Gauge to continuously grab data from a Send output value to this Screen Object: To send the current Dial Gauge value to another Screen Object for viewing, type in the object's ID label here. This object can be a Data Conversion:Input: Set this to the data format (Decimal, Binary, or Hexadecimal) which equals the format of the data being returned by the DAQ Module. Output: Set this to the data format (Decimal, Binary, or Hexadecimal) which should be displayed in the window of this screen object during Multiplier: Type in the multiplication factor which should be applied to the data before it is displayed. This can be a whole number as well as a number containing digits to the right of the decimal point. Offset: Type in the offset value which should be added to or subtracted from the data before it is displayed. This can be a whole number as well as a number containing digits to the right of the decimal point. Note, the number of digits to the right of the decimal point which will be used to label the tick marks will be the same as that of the Offset. For example, using 0.0 as an offset value will force the tick mark display to show the tenths place. Lookup Table: To convert the data using a lookup table of known substitution values, type in the filename which contains the table. If the full PATH name is not included, the file will be searched for in the current directory as shown in Math Formula: To convert the data using a mathematical expression, type in a formula here. This formula can contain the four basic arithmetic operators Configuration:Tick Marks: Select the number of tick marks to show on the Dial Gauge faceplate. These will be spaced evenly around the dial. Sub Marks: Select the number of sub marks to show Show Values: Check this box to show the numerical values of each tick mark. The number of digits to the right of the decimal point is determined by that of the Offset value. Right Value: Type in the dial level value which will represent the full Left Value: Type in the dial level value which will represent the full Warning Level: Type in the dial level value which should be marked in red on the faceplate to represent a warning. This number must be between the Left Value and the Right Value. To disable the warning indicator, leave this field blank.
|