|
ERROR!
You must enable Java Script on your browser to navigate this site. |
||
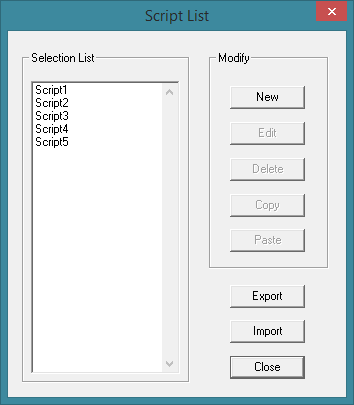
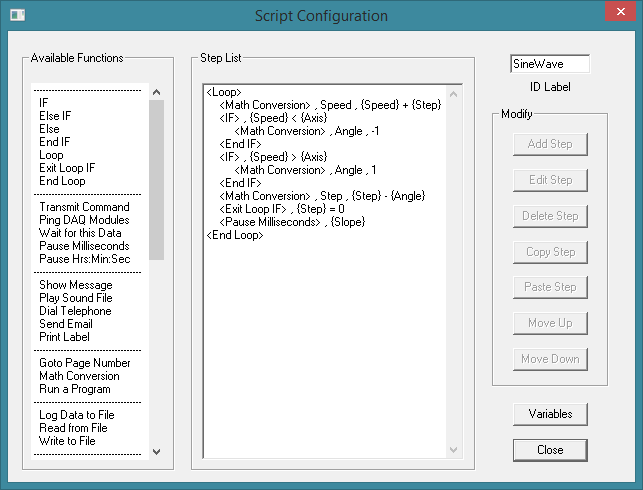
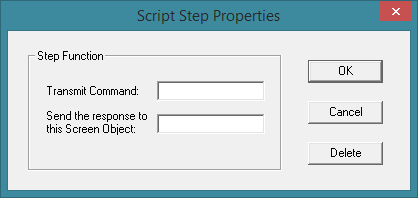
ScriptsOne of the more powerful features of ModCom is the ability to write custom scripts which act like A master Script can also be triggered automatically each time the To create or edit an existing Script, select "Scripts" in the < Script List Dialog Box: Selection List: This is the list of current Scripts if any have been created. This field will be blank if you have not yet defined any Scripts for this project. Modify:New: Click on this button to add a new Script to the project. This will bring up another dialog box which can be used to create the specific steps of the Script. See "Script Configuration" below for more details. Edit: To use this option, a Script must first be selected from the list at the left. Click on this button to edit the selected Script. This will bring up another dialog box which can be used to edit the individual steps of the Script. See "Script Configuration" below for more details. Delete: To use this option, a Script must first be selected from the list at the left. Click on this button to delete the selected Script from the project. Copy: To use this option, a Script must first be selected from the list at the left. Click on this button to copy the selected Script and place it on the clipboard. This will then enable you to open another project and paste this Script into it. Paste: To use this option, a Script must first be copied and placed on the clipboard. Click on this button to paste the current contents of the clipboard into the project. Export: Click on this button to export all of the Script configurations to a file named "Script.txt". This file can then be imported into another project, used for documentation, or edited using a text editor. Note, if editing make sure to maintain the same format as shown in the original file including all blank lines in the body as well as at the start and end of the file. Import: Click on this button to import the Script configurations from the file named "Script.txt". Note, any Script Configuration Dialog Box: ID Label: Type in a label that will be used for identification by other objects within ModCom when starting or stopping this Script. Available Functions: This box lists all of the Functions available to be used in the Script. Select an item and then click on "Add Step" to add it to the step list of the Script. Then click on "Edit Step" to edit the properties of that particular function. Step List: This box lists all of the individual steps or events which make up the Script. When the Script is called (or started) by another object within ModCom, the steps will be executed from top to bottom. Use the modify buttons at the right to edit each step or to move it up or down in the execution order. Modify:Add Step: To use this option, a function must first be selected from the "Available Functions" box on the left. Click on this button to add the selected function to the step list of the Script. Edit Step: To use this option, a step must first be selected from the "Step List" box on the left. Click on this button to edit the selected step. This will bring up another dialog box which can be used to edit the properties of that particular step. See "Script Step Properties" below for more details. Delete Step: To use this option, a step must first be selected from the "Step List" box on the left. Click on this button to delete the selected step from the Script. Copy Step: To use this option, a step must first be selected from the "Step List" box on the left. Click on this button to copy the selected step and place it on the clipboard. This will then enable you to paste this step at multiple positions in the execution order, or to open another project and paste this step into it. Paste Step: To use this option, a step must first be copied and placed on the clipboard. Click on this button to paste the current contents of the clipboard into the project. You can then use the Move Up: To use this option, a step must first be selected from the "Step List" box on the left. Click on this button to move the selected step one place up in the execution order. Move Down: To use this option, a step must first be selected from the "Step List" box on the left. Click on this button to move the selected step one place down in the execution order. Script Step Properties: Step Function:Depending on the particular function, one or more edit fields will appear and should be used to define the specific properties required for the operation of this function. Such as entering in data and/or Screen Object names, etc. Refer to the function's definition for details. Note, the edit fields in this dialog box supports variables. Script Loops:It is perfectly legal to have one or more Scripts running in a loop in the background to perform some kind of ongoing operation behind the scenes. When a Script is running in a loop, at the end of each complete cycle, ModCom exits temporarily to take care of other business such as updating the Screen Objects, processing the Conditionals, logging data to file, or even running other Script loops. In most cases, the time between cycles is adequate for this housekeeping and the Script will appear transparent; not effecting the operation of other functions being performed by ModCom. However, if a Script has an extremely long cycle time between the
|